The Incident Card displays all of the information about active incidents and allows a responder to advance through the different messages of the Incident Workflow.
Here is a description of the different components of the incident card:
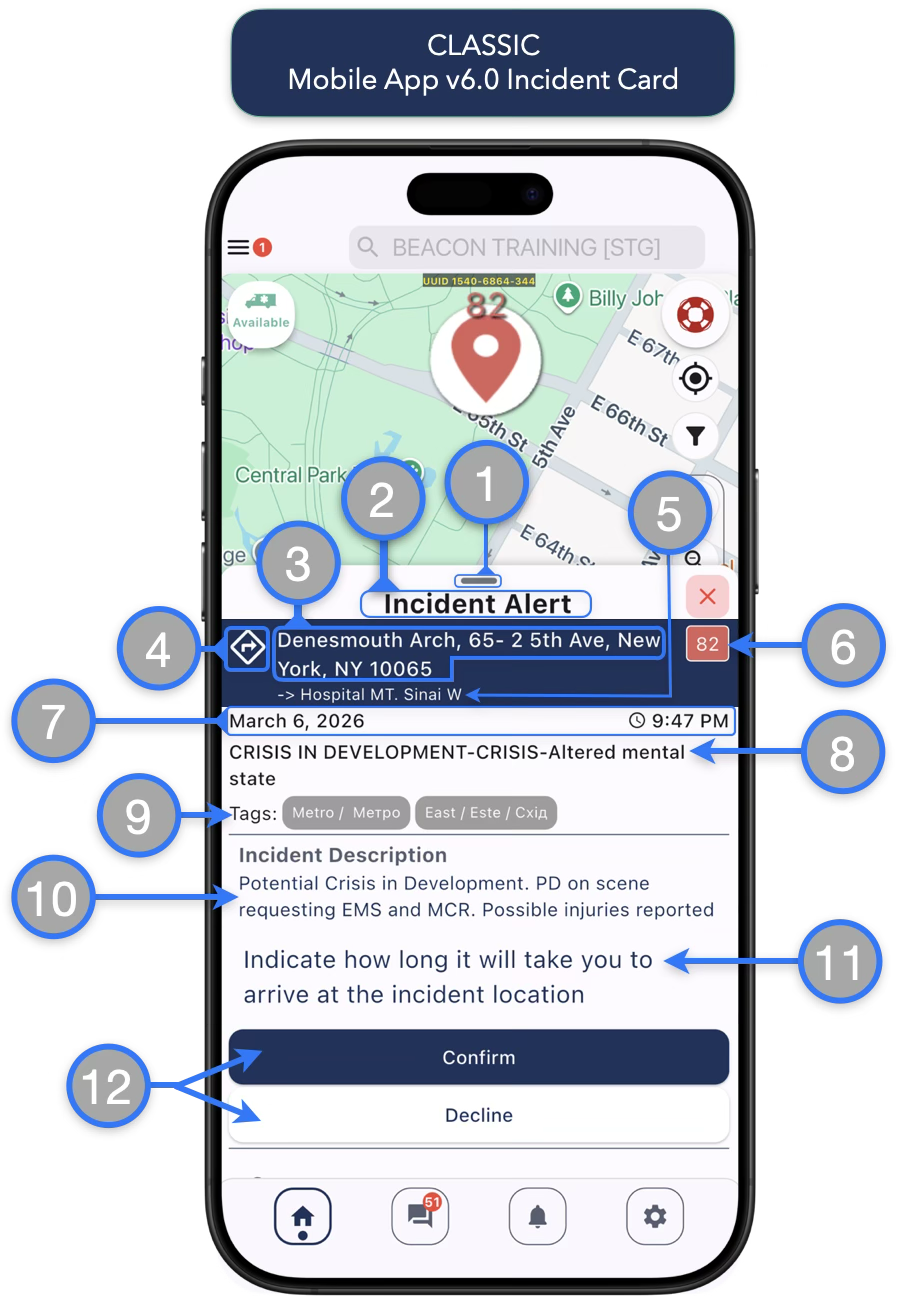
- Collapse/Expand Incident Card — Click to collapse or expand the Incident Card
- Incident Card Header — Indicates which step of the workflow messages you are currently interacting with
- Incident Address Location — The incident address text will be displayed here as entered by dispatch
- Get Route button — Click to open your preferred maps application and get step-by-step directions to the incident (e.g., Google Maps, Waze, Apple Maps etc)
- Pre-Selected or One Time Transport Destination — If the dispatcher has made a selection for transport when creating the incident alert it will be displayed on the incident card below the incident address.
- Incident Number — Click to re-center the screen on the incident location
- Incident Date and Time — Displays the date and time the incident was created
- Incident Labels — If the dispatcher used any incident labels when creating the incident they will be displayed below the date and dime
- Incident Tags — If dispatcher has used Responder Tags to broadcast the incident they will appear here
- Incident Description — Any description text entered by dispatch will be displayed in this section
- Response Prompt — Describes what action is needed to continue advancing the workflow
- Action Buttons — Describe the options to reply to the response prompts
Introduction of New Incident Card (Beta release)
Introducing new changes to the mobile app incident card to enhance the response experience and expand the capabilities
Side-by-side Comparison of the main elements of the Incident card:
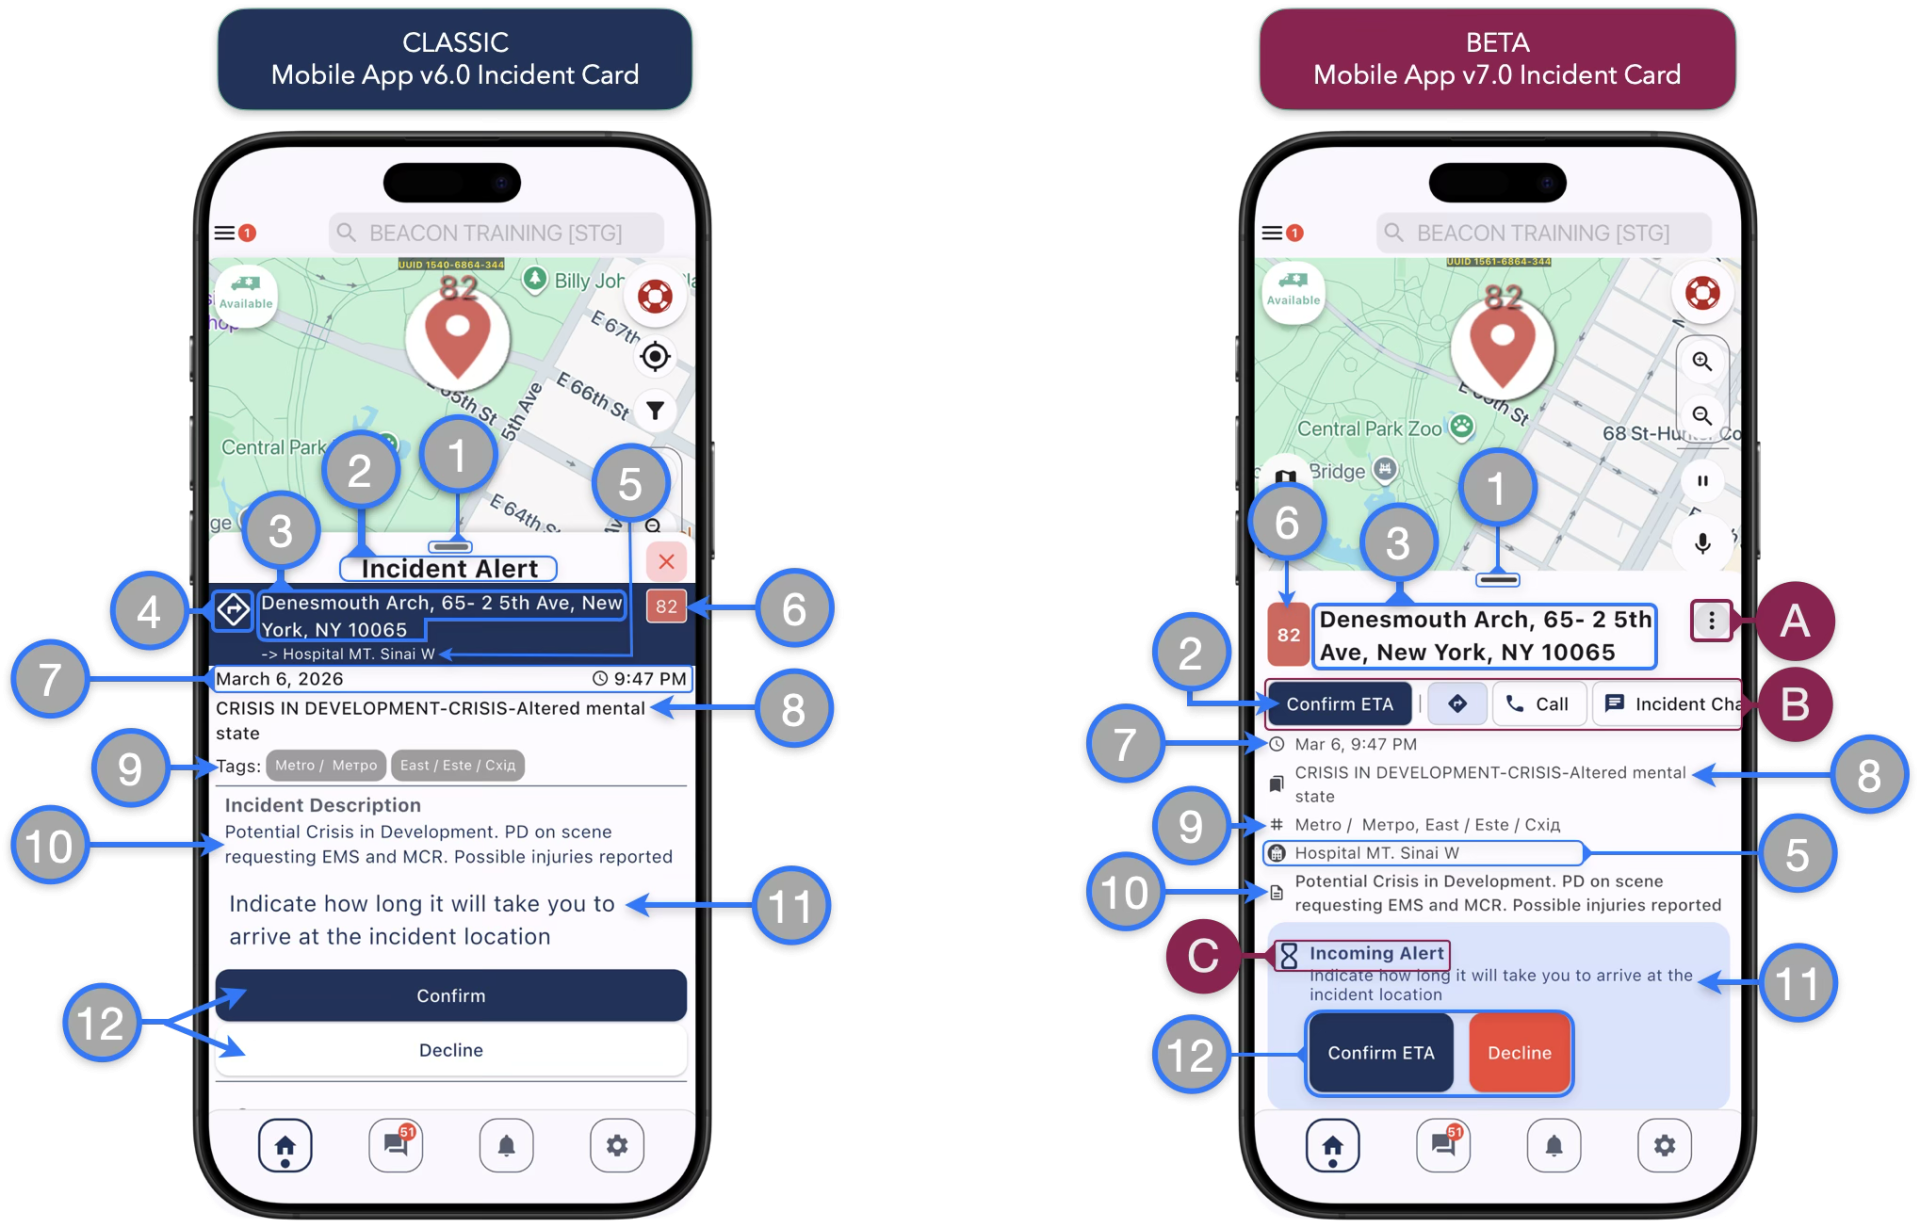
- Collapse/Expand Incident Card — Tap or scroll to collapse / expand the Incident Card
- Incident Card Header — Indicates which step of the workflow messages you are currently interacting with
- Incident Address Location
- Get Route button — Tap to open your preferred maps application and get step-by-step directions to the incident (e.g., Google Maps, Waze, Apple Maps, etc.)
- Pre-Selected or One Time Transport Destination — If the dispatcher has made a selection for transport when creating the incident alert it will be displayed on the incident card below the incident address.
- Incident Number — Tap to re-center the screen on the incident location
- Incident Date and Time — Displays the date and time the incident was created
- Incident Labels — If the dispatcher used any incident labels when creating the incident they will be displayed below the date and dime
- Incident Tags — If dispatcher has used Responder Tags to broadcast the incident they will appear here
- Incident Description — Any description text entered by dispatch will be displayed in this section
- Response Prompt — Describes what action is needed to continue advancing the workflow
- Action Buttons — Describe the options to reply to the response prompts
Beacon v7.0 Incident Card Beta Changes and additions:
Side-by-side Comparison continued:
- Incident Card Header — Indicates which step of the workflow messages you are currently interacting with
- Get Route button — Tap to open your preferred maps application and get step-by-step directions to the incident (e.g., Google Maps, Waze, Apple Maps etc)
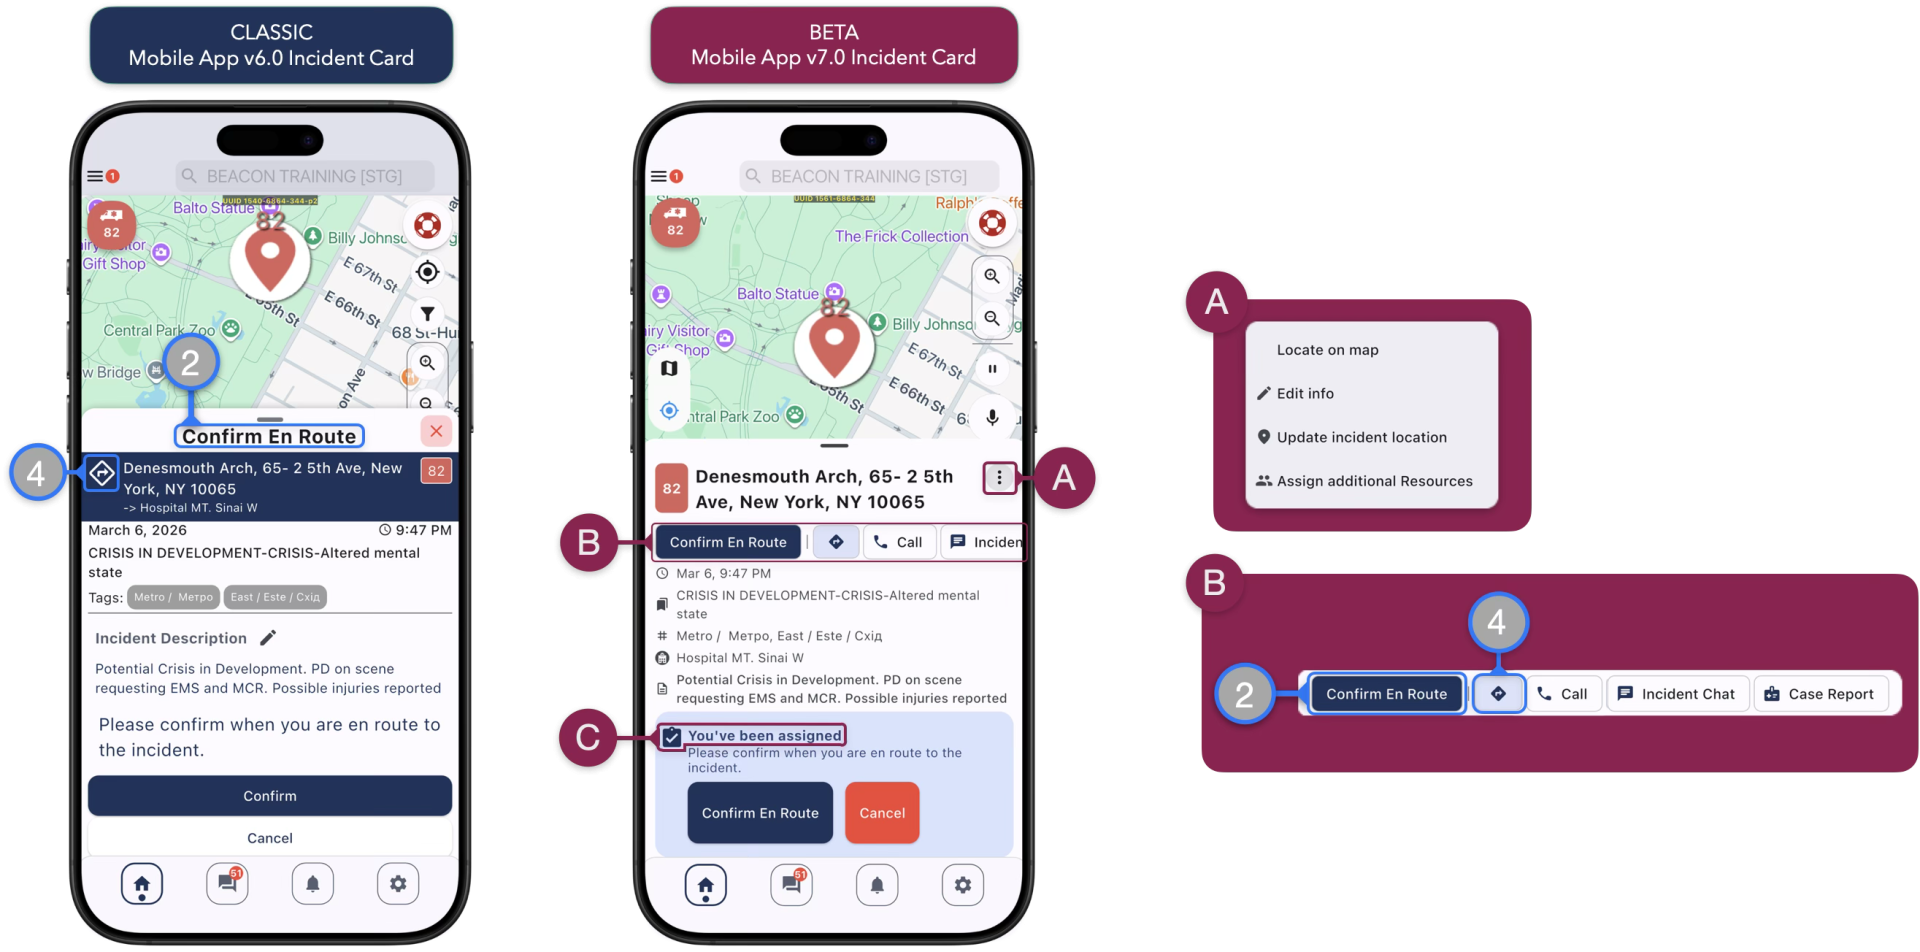
- Incident Secondary Actions — Secondary actions previously presented as buttons on some specific workflow messages are now available at all times in this incident card menu
- Quick Actions Buttons — This strip of buttons is scrollable left-right and contains quick access to regular actions to aid the response operations. On most workflow steps, the first quick action button will reflect the Incident Card Header (#2 on the Incident Card Classic)
- Responder State — The incident card will now show your current state prior to the prompt and buttons to advance the response workflow messages
Continue to the next page to learn more about the Response Workflow and Incident Messages