• Dispatcher
  • Responder
  • Videos
  • FAQ
  • Status
  • Dispatcher
  • Responder
  • Videos
  • FAQ
  • Status

User Resources

home/Documentation/User Resources
  • Dispatcher Resources
    • Getting Started
      • Dashboard Navigation
      • Profile Menu
      • Responders Panel
      • Active Incidents Panel
      • Settings (ᵐ)
    • Key Functions
      • Add and Edit Responders (ᵐ)
      • Select Responder Type (ᵐ)
      • Add and Edit Web Users (ᵐ)
      • Map Layers
      • Transport Options
        • Add Transport Destinations
        • Arrival Notifications
      • Map Editing
      • Chats Feature
      • Push-To-Talk
      • Create Incident Panel
        • Creating Incidents
        • Pending Incidents Feauture
        • Dispatch Mode (previously called Incident Priority)
        • Alert Types (previously called Dispatch Types)
        • Responder Tags
        • Assigning Responders
        • Custom Incident Labels (ᵐ)
      • Dispatch Automation
        • Broadcast Alerts
        • Preferred ETA
        • Confirmation Windows
      • Monitoring Incidents
      • Dispatch Controller
      • Add Incident Disposition Codes
      • Add Dispatcher Incident Comments
    • SMS Functionality
      • SMS Chat Messaging
      • Add SMS Dispatcher (ᵐ)
      • Create Incidents by SMS
    • Reporting
      • Reports Automatically Generated by Beacon
        • Incident Reports
        • Summary Reports (ᵐ)
      • Documentation Manually Added by Responders
        • View Incident Notes (ᵐ)
        • Case Reports
    • More Dispatcher Resources
      • Practice Exercises
      • External Factors
  • Responder Resources
    • Mobile App interface
      • Beacon Mobile App Tour
      • Getting Started
        • Initial Sign In
        • Home Screen
        • SOS Feature
        • Map Features
        • Sidebar
        • Manage Responders
      • Response Workflows
        • Responder Types and Workflows
        • Incident Card Navigation
        • Incident Alert
        • En Route
        • Arrival On Scene
        • Additional Resources
        • Destination Transport
        • Arrival at Destination
        • Complete Incident
        • Response Times Summary
      • Documentation
        • Submit Incident Notes (Mobile App)
        • Case Reports
      • Other Features
        • Mobile App Chat
        • Push-To-Talk
        • Create New Incidents
        • Incident Dispatch Mode
        • Update the Incident After Creation
        • Interactive Notifications
        • Alerts Vibration for Beacon
        • Duty Scheduler
        • Special Permissions for Mobile App Users
        • Mobile App Settings
    • SMS Interface
      • Full Manual for SMS Users
      • SMS Code Index
      • Submit Incident Notes (SMS)
      • Requesting Additional Resources (SMS)
      • SMS Chat
    • Practice Exercises
  • Case Reports
    • Introduction to the Case Reports Feature
    • Setting Up Case Reports
    • Mobile App Case Reports Feature
    • Web App Case Reports Feature
  • GPS Settings & Tracking Services
  • Downloads
    • Web Dispatcher Cheat Sheet
    • Mobile App Responder: Patient Transport
    • Mobile App Responder: Response-only
    • Dispatcher Practice Exercises
    • SMS Responder: Response-only
    • Responder Practice Exercise
    • Alerts and Sound Settings
    • Dispatcher Guide Downloadable
    • Responder Guide Downloadable
    • Beacon Reporting Features Guide
    • Manager Assessment
  • Videos
  • Status

Initial Sign In

Registering a responder under an Agency Account is the first step in order to be able to use the Beacon Mobile App. Beacon Account Managers and Mobile Managers are the only users that have the ability to add, edit and delete responders; please refer to them if you need a responder account registered.

Follow the instructions detailed in this page or click here watch a video to learn how to perform Initial Sign In on the Beacon Mobile App

To make sure that the responder information is registered correctly pay special attention to the following aspects:

  1. First/Last Name — Enter the responder’s first and last name
    • Note: If the user is a response vehicle, enter the vehicle identifier in the Last Name section only (e.g., Unit 414)
  2. Phone Number — Be careful to select the correct international code by using the correct flag
    • Note: If phone numbers begin with “0” when dialing domestically, it should not be included at the beginning of the phone number.
  3. Email — Enter an email for the responder account. Adding an email that works is an alternative to access the responder interface.
  4. Responder Type — Set the type of response workflow required for the responder.
    • Transports Patients — Workflow for responders who will transport patients to the hospital or other destination facilities
    • Response Only — Workflow for responders who only respond to the incident scene, but don’t provide transport (e.g., Firefighters, Community Responders etc)
    • Transports Animals — Workflow for animal rescue groups who transport animals to clinics
    • Transfer/Delivery — Workflow for responders who transfer patients and/or make multi-stop deliveries
    • Notification Only — For agencies that only need Responders to acknowledge alerts

To preform Initial Sign Up:

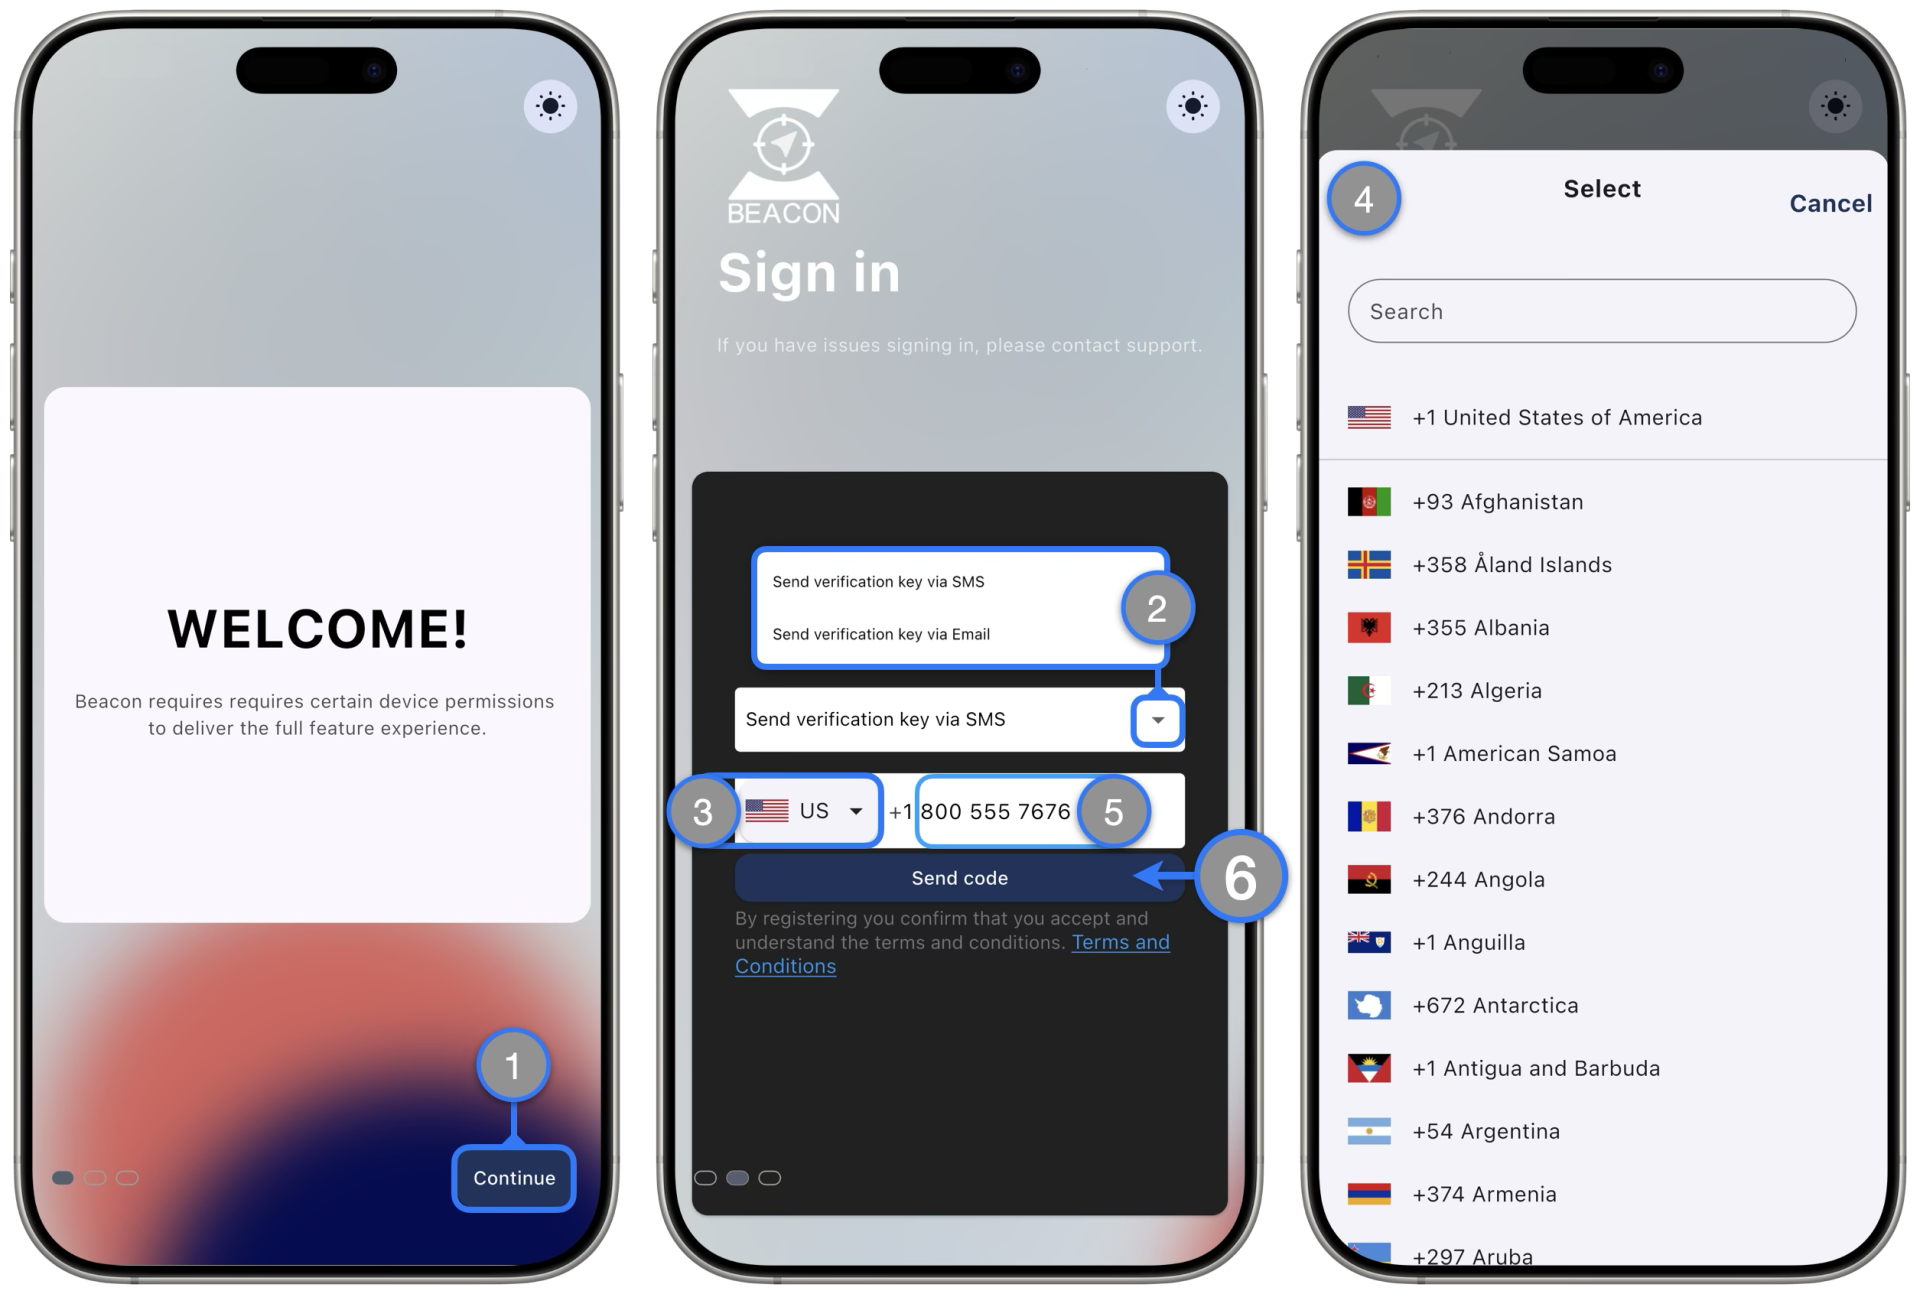
  1. Open the Beacon Mobile App and tap the Continue button on the Welcome Screen
  2. Select the verification key delivery method:
    • Send via SMS (Text Message)
    • Send via Email
  3. Tap the dropdown arrow to show the list of phone international country codes; flags will display with the codes to help identifying the correct code
  4. Select the correct flag for you phone number’s country code
  5. Enter the rest of the phone number on the field without any spaces or symbols
    • Important: Do not include the digit zero ( 0 ) if after the country code the phone number begins with it. For example, some UK phone numbers start with 0 after their country code; for those cases:
      • ❌ : +44 0 1234 567899
      • ✅ : +44 1234 567899
  6. Tap Send code when ready

    If the phone number is registered to a responder account Beacon will redirect to the Verification dialog

Continue Initial Sign Up:

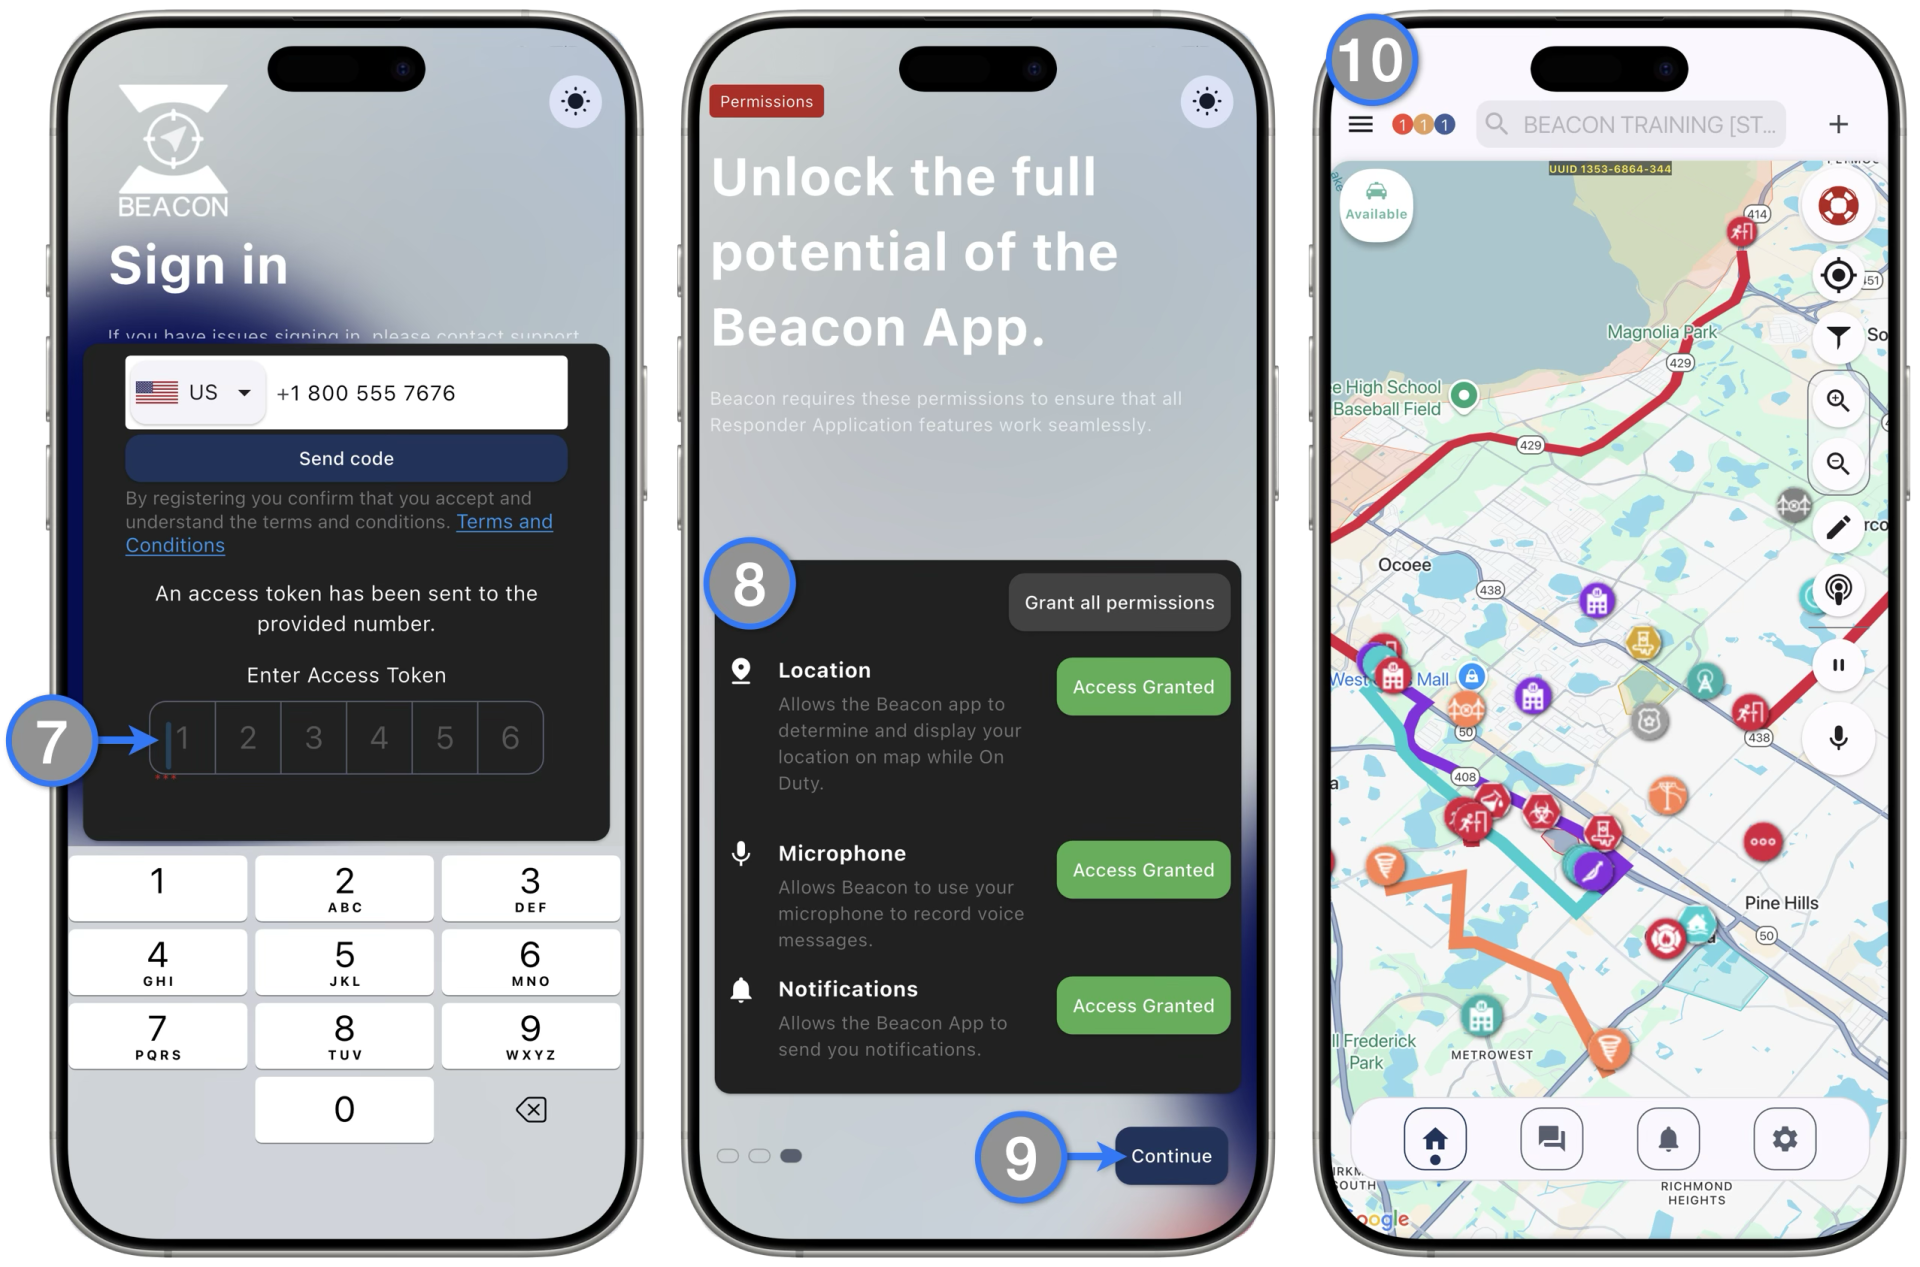
  1. Enter the verification key received by the selected delivery method. If the code entered is correct, Beacon will go to the next screen
  2. Take a chance to read and grant the desired Permissions as they will set initial configurations that include Notifications and Location Sharing settings. ( More dialogs might pop-up requesting additional levels of permissions, make sure to read them carefully. )
  3. Tap Continue when ready
  4. The mobile app Home Screen will load

Related Articles
  • Responder Types and Workflows
  • Pending Incidents Feauture
  • Duty Scheduler
  • Manager Assessment
  • Incident Card Navigation
Previous
Getting Started
Next
Home Screen

Dispatcher Resources

Responder Resources

Downloads

Status

Contact Us:

 [email protected]

 ENG +1.218.4 BEACON

(+1.218.423.2266)

 ESP +1.787.336.0123

*These are not emergency phone numbers.
In case of emergencies, please call your local emergency service.
  • Privacy Policy
  • Terms of Use
  • ©2025 TREK MEDICS INTL ALL RIGHTS RESERVED