Creating new incidents in Beacon can be as straightforward as adding the incident location and description and clicking “Create”. It can also involve more advanced functions. This page describes in depth the full range of features available to dispatchers when creating new incidents, including:
- Create an Incident through the New Incident Panel
- Request location update from caller via SMS
- 3rd-Party Mapping Integrations
- Editing Incorrect Addresses
- Updating Incident Locations
New Incident Panel
To create a new incident to alert responders:
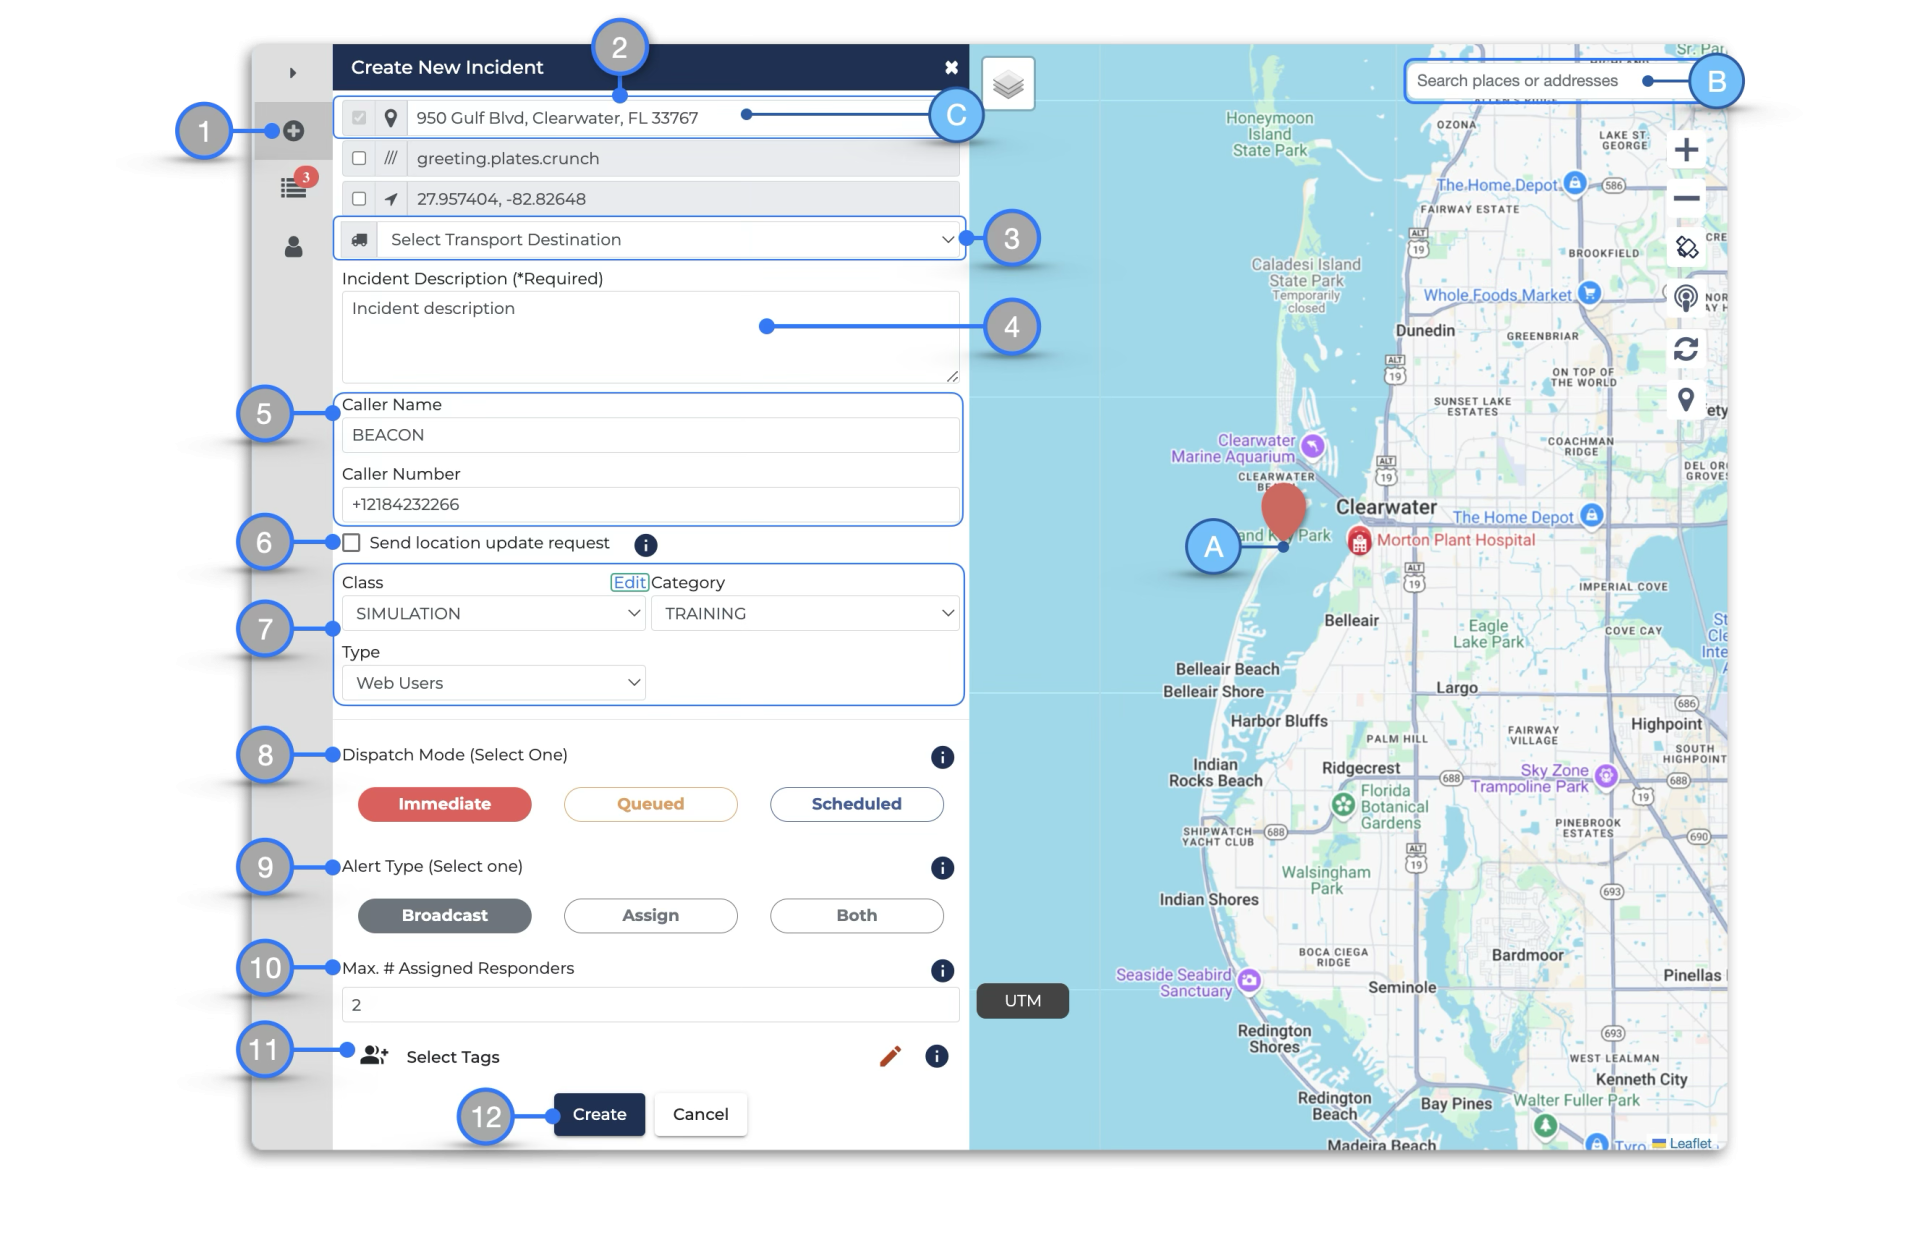
- Click Create New Incident
- An Incident Location is required in this field to create the incident. The location is generated by placing an Incident Marker on the correct map location.
There are two main ways to place an incident marker (A & B):- A. Click on the map to place the Incident Marker where the incident is located. The address will automatically populate the Incident Location field (#2 above). Clicking on the map again or moving the incident marker intentionally will change the location therefore the address and Lat./Long. will also change.
- B. Use the Search Bar to find a physical address, nearby landmarks or the latitude/longitude*
- C. If necessary, dispatchers can also edit the Address, for example to add an apartment number or update an incorrect address
- Note: Editing the address will not change the location of the Incident Marker
- Pre-Selected and Custom Transport Destinations — Beacon allows dispatchers to pre select an existing transport destination or create a one-time-use custom transport destination for the incident. Either option will be communicated on the responder’s mobile app interface when assigned to the incident. (Read more about this bellow)
- Add a Description (required)
- It’s important to describe the incident location accurately, especially for SMS Responders who cannot use the map to locate the incident. However, be sure to avoid including personally identifiable information or protected health information here.
- Enter the Caller Name and Number (in case there is a need to call them back)
- ** IMPORTANT ** — Phone numbers should be entered in international format including the country code and area code as it applies without any symbols or spaces between the numbers: +18001234567
If the number begins with the digit zero “0” when dialing domestically, do not include this zero when typing in the number:
✅ Correct form +441234567890
🚫 Incorrect form +44 0 1234567890
- ** IMPORTANT ** — Phone numbers should be entered in international format including the country code and area code as it applies without any symbols or spaces between the numbers: +18001234567
- Send Location Update Request — check this box to send an SMS link to the caller that will update the incident location based on their device’s GPS location (Learn more here)
- Select the Incident’s Class, Category and Type (these can be customized by clicking the “Edit” link only available for Managers )
- Select the Incident Priority
- Incident Priorities determine how and when Responders can receive and reply to incident alerts. Learn everything about Incident Priority here.
- Select the Dispatch Type
- Important! Please read: Dispatch Types for more explanation on the difference between the Broadcast and Assign options — it will save you a lot of trouble if you are not familiar with basic dispatching principles
- Practice: After you’ve read about the different Dispatch Types, download this PDF with practice exercises so you can see exactly how they work
- If you are sending out a Broadcast Alert, choose the Maximum Number of Responders Assigned to this incident. The default quantity will be used if not edited. The default quantity can be changed in the Settings page.
- Select responder Tags as desired. Learn more about responders tags here.
- Note: If you selected to “Assign” responders in the Dispatch Type section (#8, above), that menu option will replace the Tags option shown here
- Click Create at the bottom of the New Incident Panel to create the incident and send the alert
*Note: Latitude / Longitude should be entered using Signed Degrees format: e.g., 42.55782, -120.98657
To learn more about the Broadcast Alert and Assign Responder functions, read the Alert Types page.
Pre-Selected Transport Destinations
When a Web Dispatcher knows which Transport Destination the Responder needs to transport to, they can now Pre-Select the Transport Destination when creating the Incident.
To Pre-select the Transport Destination:
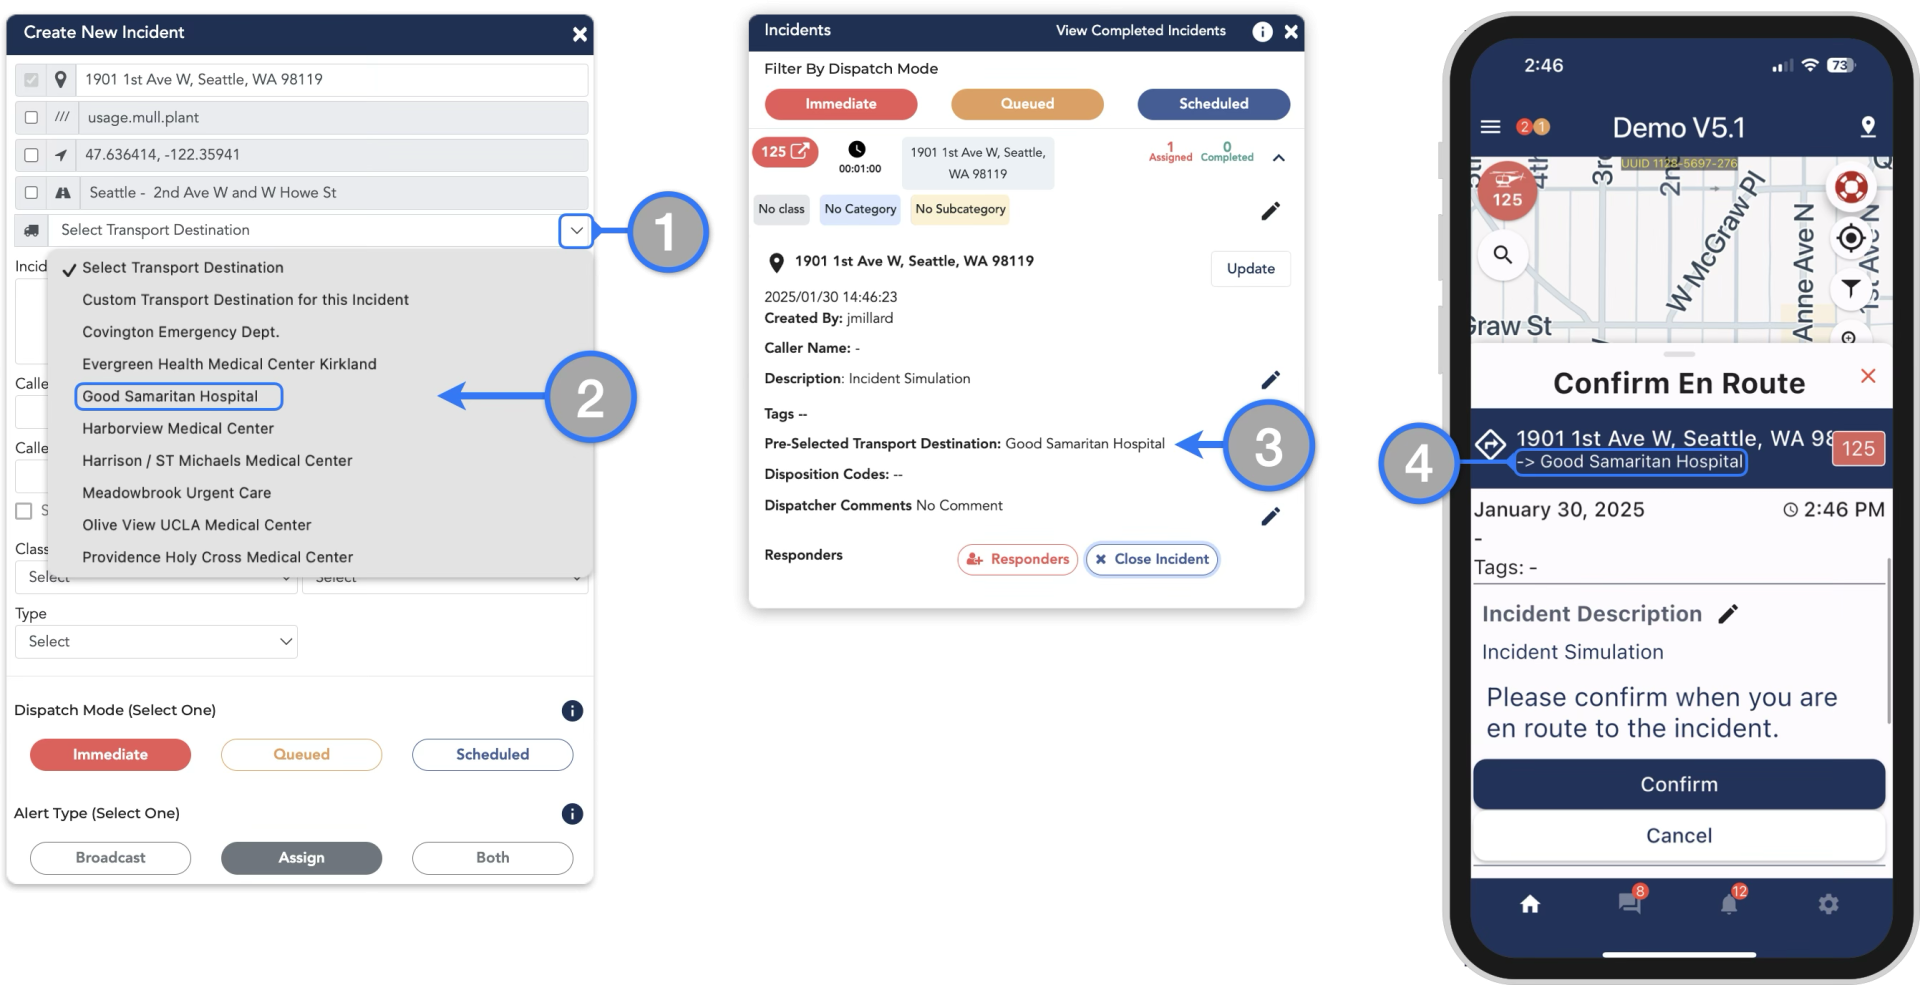
- In the Create New Incident panel Web Users will see the Transport Destination selection field.
- Select the desired Transport Destination from your list of hospitals, clinics, shelters, etc.
- The Pre-Selected Transport Destination will be displayed in the Active Incident panel.
- The Responder will be able to see the Pre-Selected Transport Destination in the mobile app’s Incident Card.
One-Time Custom Transport Destinations
When a Responder needs to transport someone to a Transport Destination that has not already been added to their map (e.g., if they have to transport to a private residence), Web Users can add a One-Time Custom Transport Destination when creating the Incident.
To add a One-Time Custom Transport Destination:
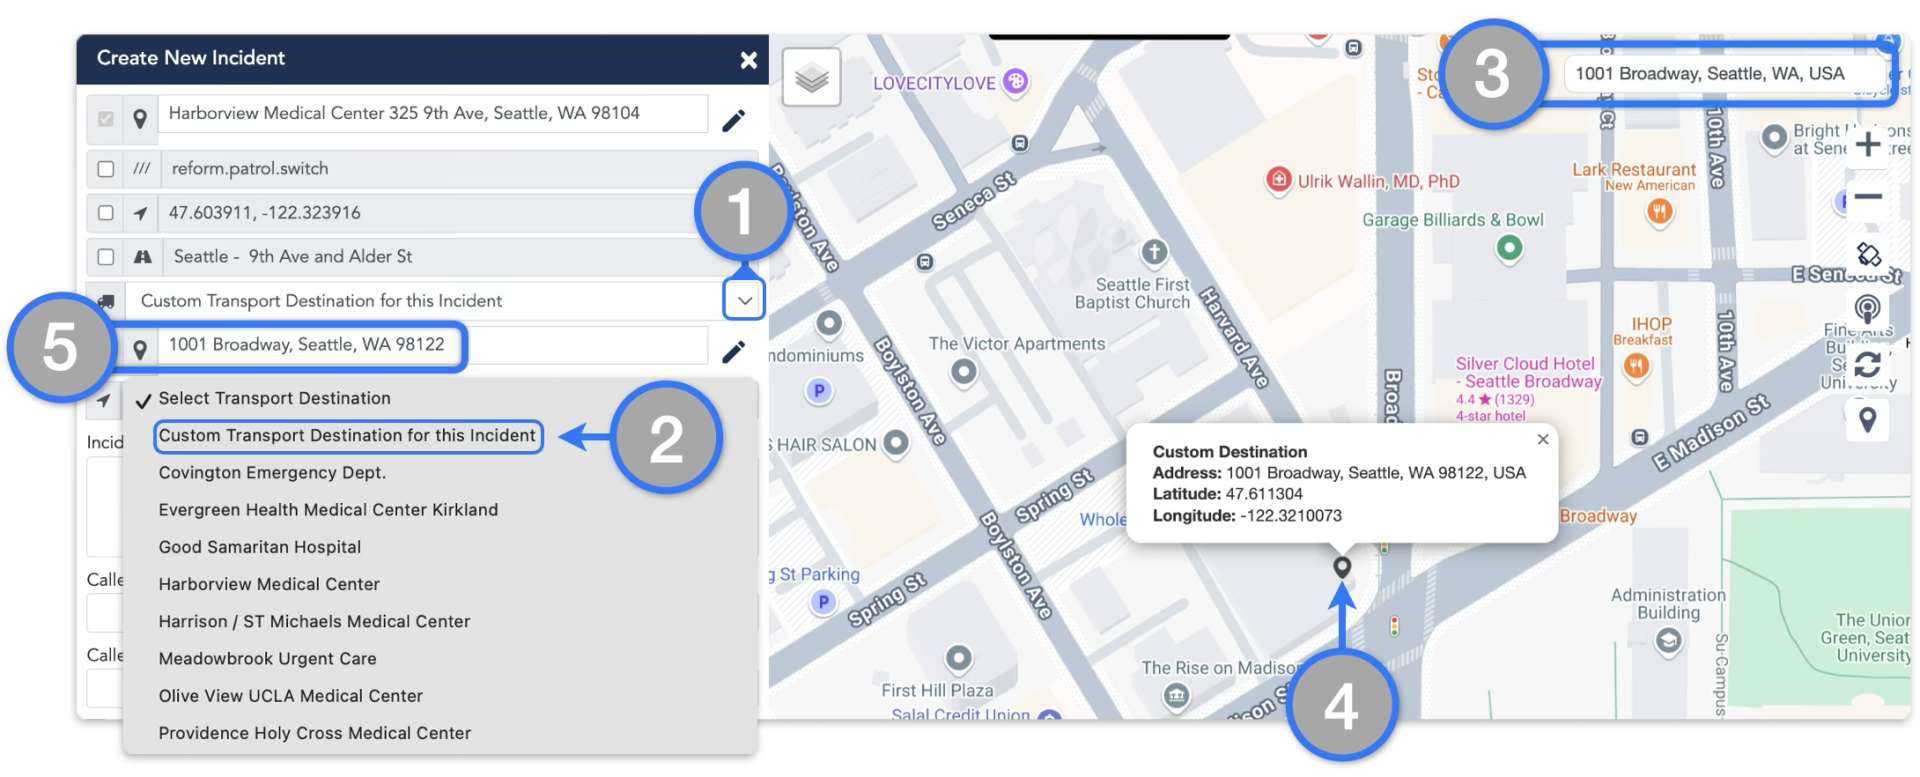
- In the Create New incident panel click on the Transport Destination selection field
- Select Custom Transport Destination for this Incident
- Search for the address in the Map Search bar
- It will appear on the map as a Black Map Marker
- Confirm that the Address is correct under the Custom Destination field
On the mobile app side:
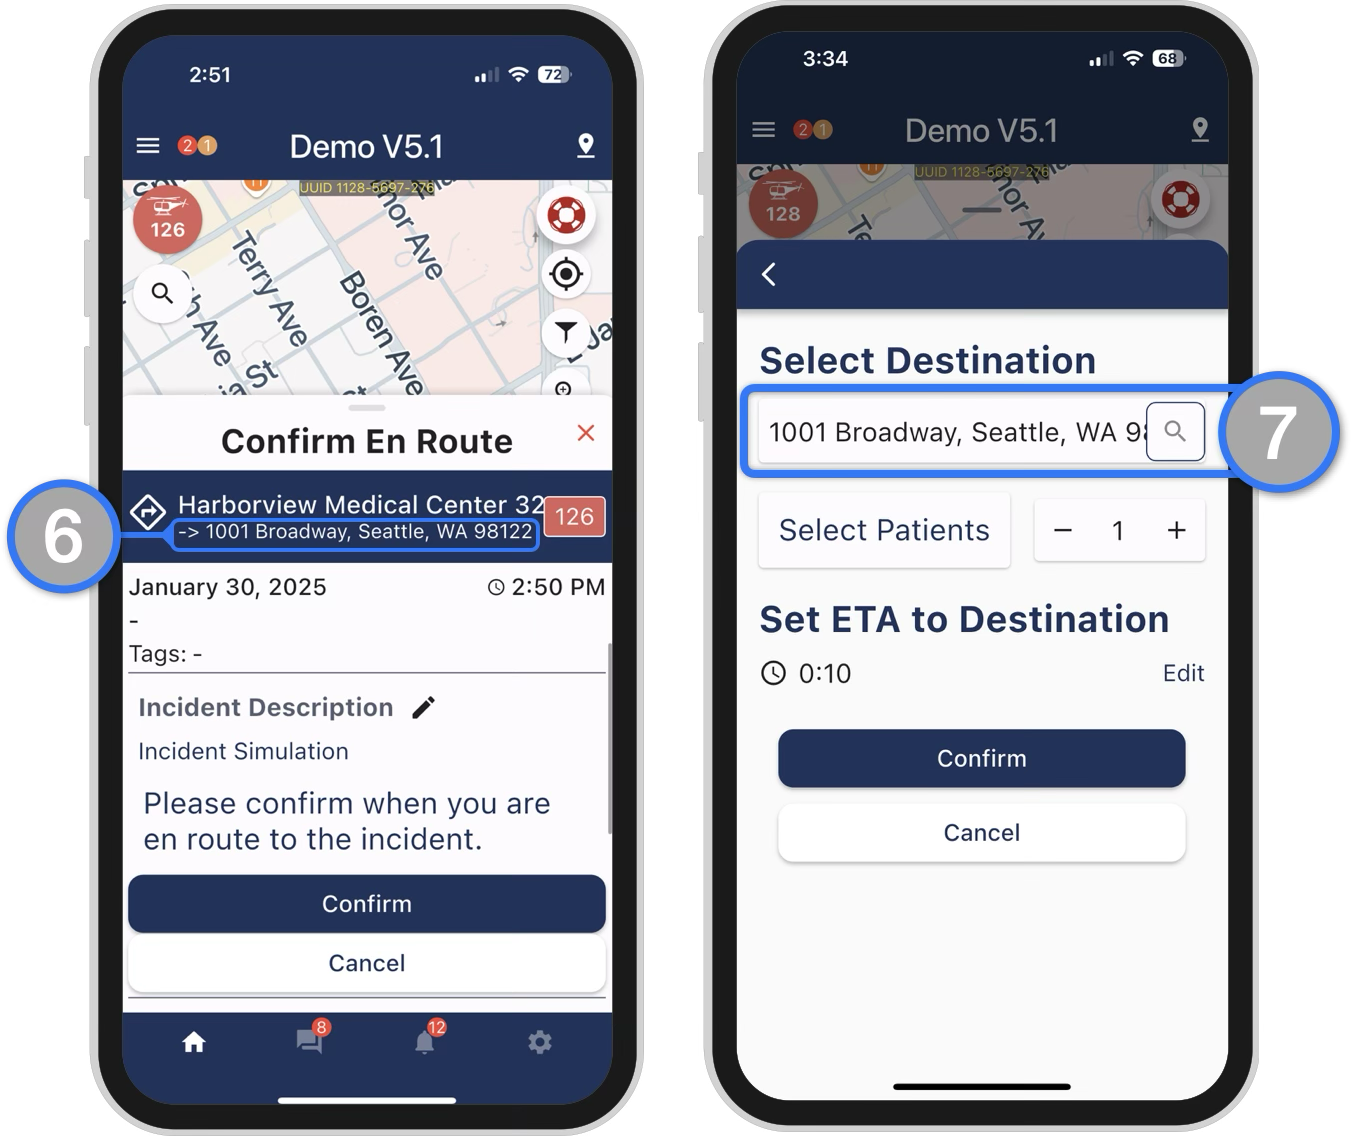
- The responder will be advised of the Custom Transport Destination in the Beacon Mobile App Incident Card
- It will also Pre-populate into the destination field when Confirming Transport through the incident workflow
Incident History Feature
When creating an incident, Web Dispatcher can now view a historical list of previous incidents based on Incident Location (GPS Coordinates) and Caller Number

When creating an incident, if the address (GPS coordinates) is identified as used for previous incidents on your Agency Account, the dispatcher will notice a history icon next to the coordinates.

Note: Incident History based on GPS location uses a default search radius of 50 meters (160 feet) from the selected location.
The incident history search radius is editable in the Incident Settings Menu (ᵐ):
(This is only available for Managers )

- Open the Settings menu
- Go to Incident Settings
- Open Default Incident Search History Radius.
- Enter preferred search radius between 5 – 5000 meters (16 – 16,000 feet).
- Save your settings
When creating an incident, if the Caller Number is identified as used for previous incidents on your Agency Account, the dispatcher will notice a history icon next to the Caller Number field.

Request location update from the caller via SMS
Dispatchers can now send an SMS link to the caller that will update the incident location based on their device’s GPS location (internet-connected smartphones only).
To send location update request:

- A caller telephone number must be provided in international format so Beacon can send out the SMS and link.
- ** IMPORTANT ** — Phone numbers should be entered in international format including the country code and area code as it applies without any symbols or spaces between the numbers: +18001234567
If the number begins with the digit zero “0” when dialing domestically, do not include this zero when typing in the number:
✅ Correct form +441234567890
🚫 Incorrect form +44 0 1234567890
- ** IMPORTANT ** — Phone numbers should be entered in international format including the country code and area code as it applies without any symbols or spaces between the numbers: +18001234567
- After the incident is created the caller will receive an SMS with a one-time link to provide their mobile device’s GPS location to Beacon that will update the location of the incident and notify all assigned responders of the updated location.

- When the caller clicks the SMS link received from Beacon, they are directed to a landing page that explains that Beacon will use their device’s GPS location to update responders to the incident location.
- The caller will need to give the necessary consent for their device’s location to be shared with Beacon.
- The caller will receive a confirmation message that their location has successfully been captured and transmitted to the responders.
** Additional Notes:
- The caller must still be at the scene of the incident when using the location update link.
- The location update link can only be used once.
3rd-Party Mapping Integrations
Beacon has additional integrations to assist in transmitting accurate locations for SMS users, including:

- What3Words.com
- GPS Coordinates
- Nearest Crossing Street: Checking this box will display the nearest on the Incident Summary Card for both Web Dispatchers and Responders.
For SMS Responders the nearest crossing street on the message alert received will be identified by a pound symbol (#) followed by the information of the current incident location street and the nearest intersecting street.
When these boxes are checked, the displayed coordinates will be included in SMS messages sent to Responders. The What3Words coordinates of the Incident Location are not sent to Responders using the mobile app because the location is already displayed on the map in the Beacon mobile app.
The GPS coordinates of the Incident Location can be viewed by clicking on the Address field included in the Incident Summary Card.
Editing Incorrect Addresses
Beacon uses mapping libraries to find addresses using a process called “Reverse Geo-Coding”. In short, this means that when you click on a map location, Beacon looks up the GPS coordinates to see what address is tied to those coordinates. While this works well in most cases, it’s not perfect — some places don’t have physical addresses that have been added to the libraries or they don’t have addresses at all. Fortunately, Beacon allows you to edit these addresses to make sure you are giving the most accurate description possible.
Here are three common scenarios that result in incorrect addresses and how to correct them:
1. Locations that have no Addresses
Sometimes, the location you’ve selected simply doesn’t have a physical address — for example, a river bank, a mountain trail, a field, etc. When the map library has no address to give you, it usually defaults to “Unnamed Road“. The easiest way to resolve this problem is to:

- Place the Map Marker exactly where you want it
- Confirm that the Address isn’t accurate and then
- Edit the Address to make it say what you want
In the image below, you can see that the dispatcher was told by a witness that the incident was at the mouth of Summerville Creek but that isn’t an address that the library would store, so the dispatcher simply updates the address manually.
2. Locations within Parks
Parks cause different problems than locations with no addresses but are essentially handled the same way — just edit the address to make it say what you want.
It’s important to keep an eye on parks though because placing your map marker on the correct location will often return an address. The problem is that the address is often the nearest building, typically the one right across the street. This is problematic because if Responders see an address in their alert, they’ll likely assume the incident is at a physical address — and not at the park across the street, especially if the incident is in the middle of the park.
In the image at right you can see how this can be corrected:

- The dispatcher places the map marker at the southeast corner of the park, as described by the witness
- However, the address that the library displays is a physical address: 4616 Cortelyou Ave.
- 4616 Cortelyou Ave. is actually a house across the street from the park
- The dispatcher edits the address to display the correct location
- Then the dispatcher adds additional instructions to make sure the Responders have an accurate location as possible
3. Locations within Intersections
Intersections are essentially handled the same way as the others — just edit the address to make it say what you need it to say. Sometimes we’ve seen that placing the incident marker can bring up an intersection by default, but it’s not consistent.
In the image at right you can see an example:

- The dispatcher places the map marker at the intersection of W. 12th St. and 6th Ave., as described by the witness
- However, the address that the library displays is a physical address: 485 6th Ave, which is actually a building
- The dispatcher edits the address to display the correct location
- Then the dispatcher adds additional instructions to make sure the Responders have as accurate a location as possible
Update Incident Location
Sometimes, the incident location will have to be updated after the incident has been created. Follow these steps to update the incident location:
- Display the Incident Summary Card by clicking the carat
- Click Update
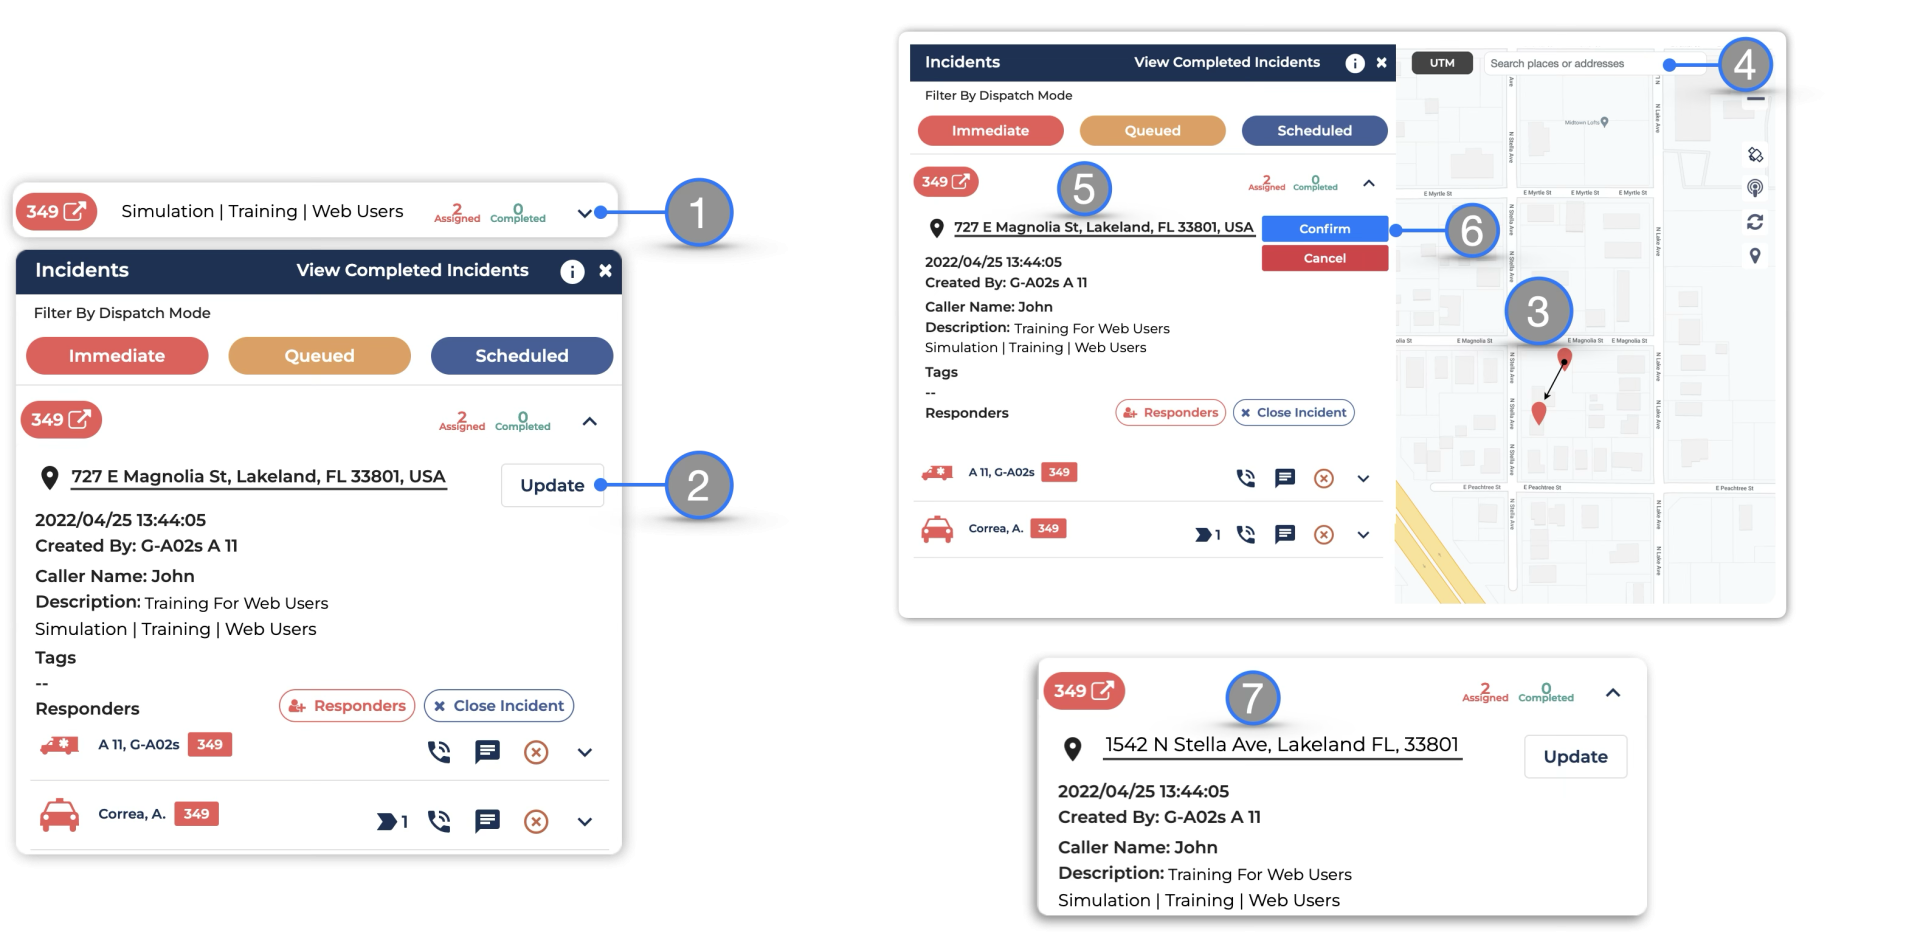
There are different ways dispatchers can update the location:
- Moving the Incident Marker to the updated location in the map (will update the coordinates and also overwrite the address text field– #5 in the graphic)
- Using the search bar to look up the address or coordinates and then placing the Incident Marker to the updated location on the map (will update the coordinates and also overwrite the address text field– #5 in the graphic)
- Typing in a custom location in the address text field (will only update the address text field without affecting the actual coordinates of the incident / incident map marker)
- Click Confirm when you are ready; an alert with updated information and coordinates will be sent to assigned responders and dispatchers online
- Updated address / location info will be displayed here
Update Incident Description
Dispatchers are now able to update the description of the incident after the incident has been created.
To update the Incident Description, open the incident summary card and:
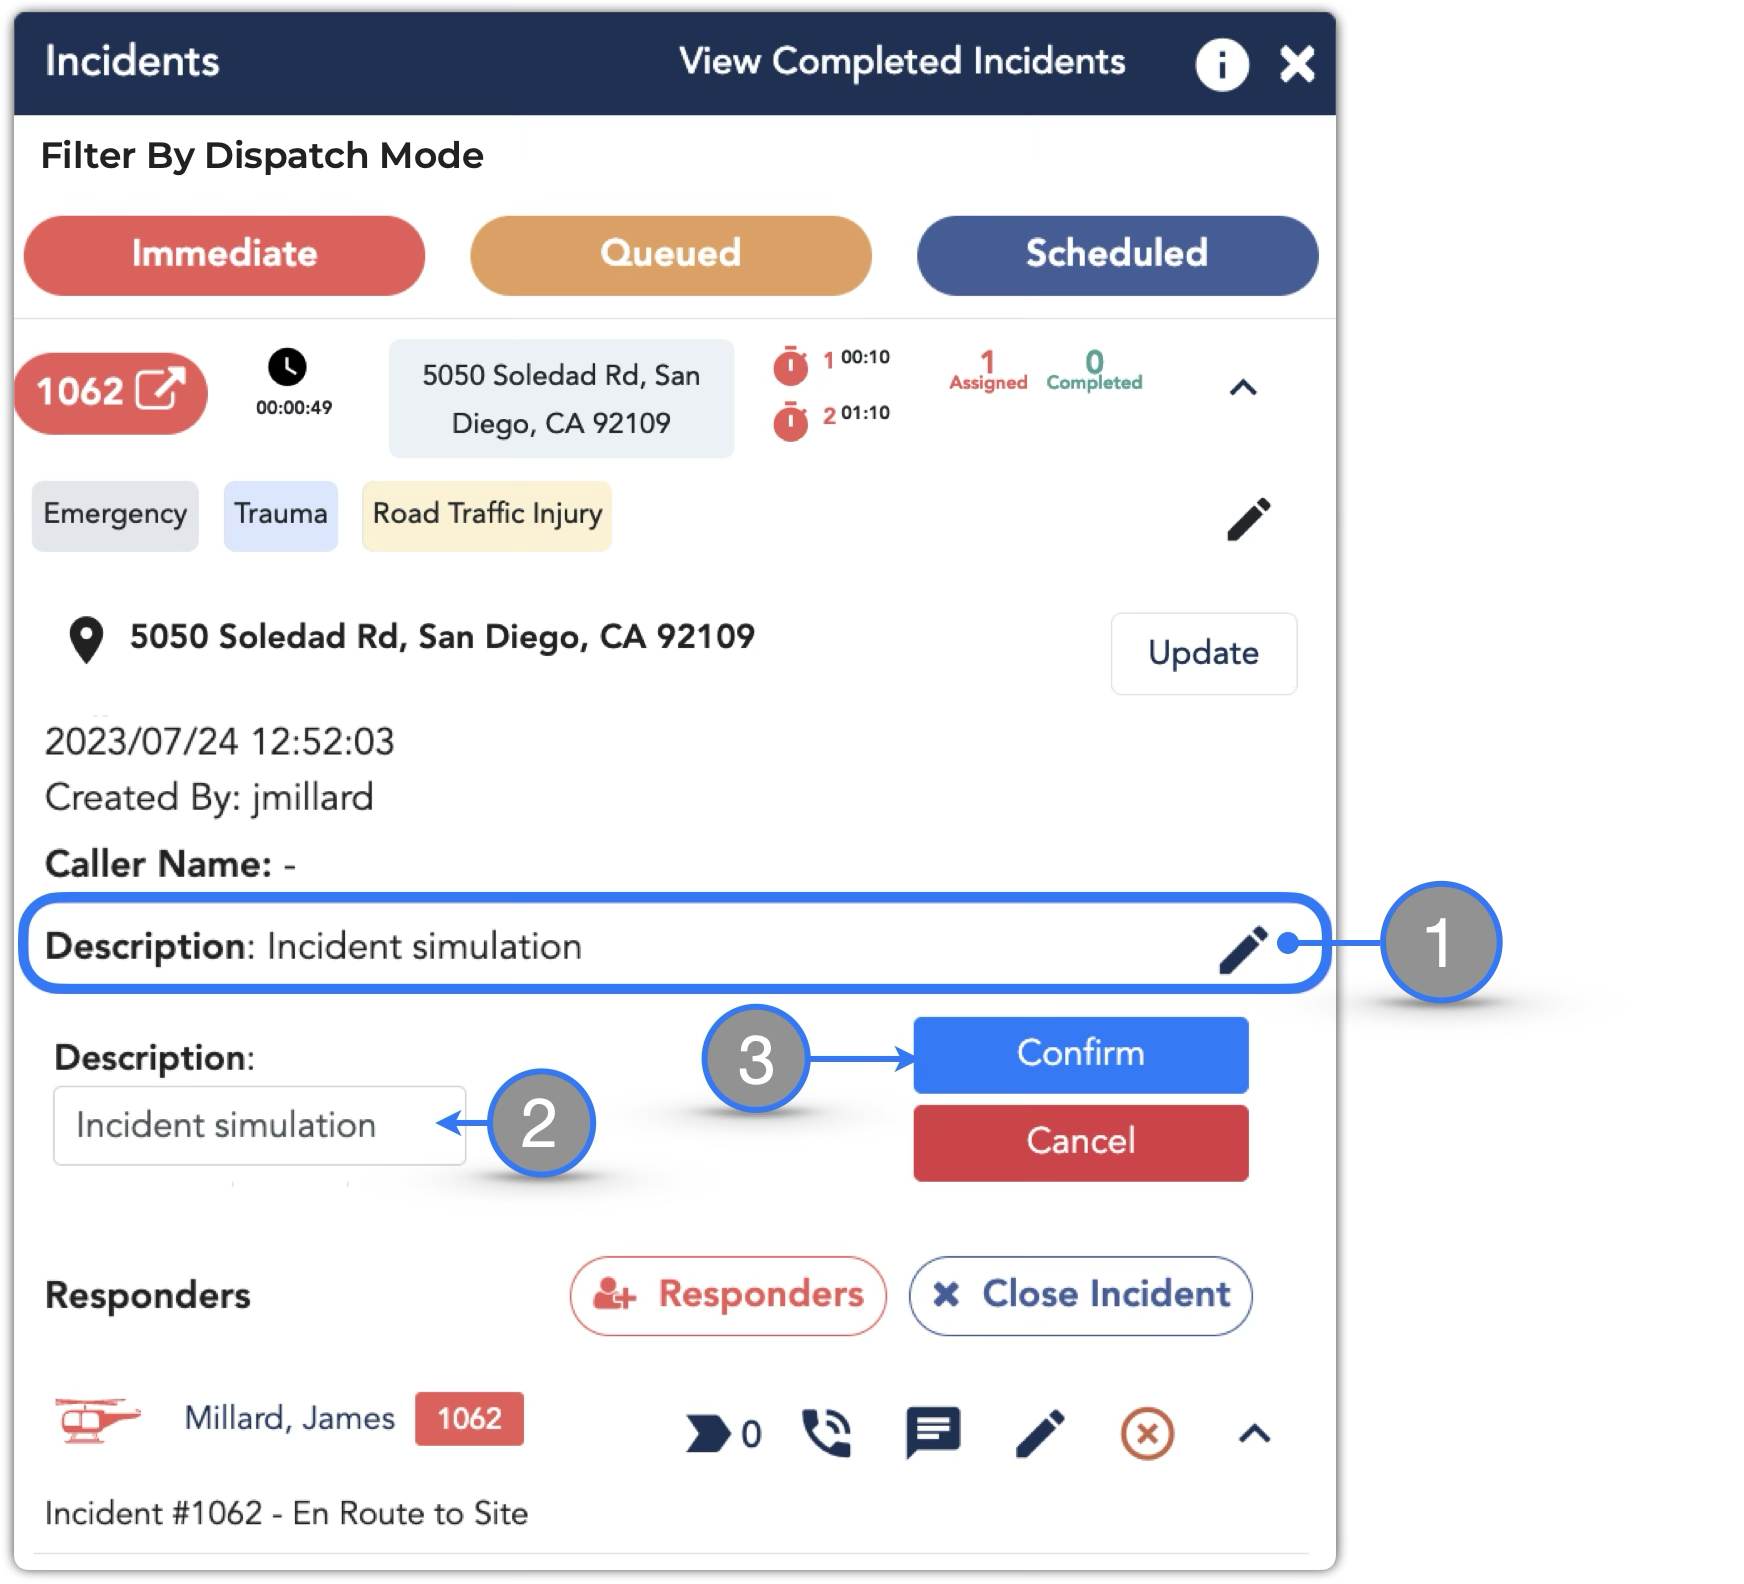
- Click the Edit icon
- Update the incident description as needed
- Click Confirm when finished
Once the incident description has been updated all assigned responders are notified via push notification and chat of the update.